|
|
VxVM System Administrator's Guide
The following topics are covered in this chapter:
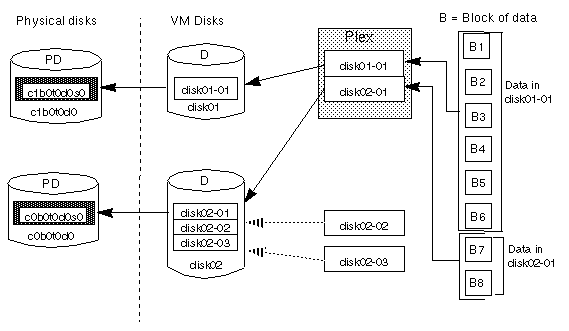
To understand the Volume Manager, you must first understand the relationships between physical objects and Volume Manager objects.
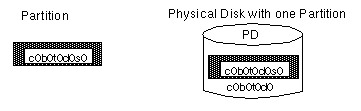
c#b#t#d#, where c# is the
controller, b# is the bus, t# is the
target ID, and d# is the disk number. The disk in
Figure 1 is disk number 0 with a target ID of
0, and it is connected to controller number 0 in the system.Figure 1 Example of a Physical Disk
s#,
is given at the end of the device name. Note
that a partition can take up an entire physical disk, such as the
partition shown in Figure 2.Figure 2 Example of a Partition
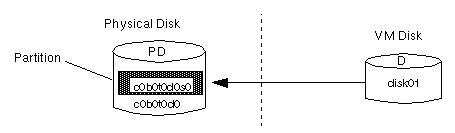
The relationship between physical objects and Volume Manager objects is established when you place a partition from a physical disk under Volume Manager control.
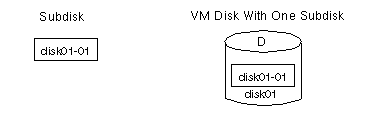
A VM disk is accessed using a unique disk media name, which you can supply (or else the Volume Manager
assigns one that typically takes the form disk##). Figure 3 shows a VM disk with a disk media name
of disk01 that is assigned to the partition c0b0t0d0s0.
With the Volume Manager, applications access volumes (created on VM disks) rather than partitions.
rootdg (the root disk
group). Additional disk groups can be created, as necessary. Volumes
are created within a disk group; a given volume must be configured from
disks belonging to the same disk group. Disk groups allow the
administrator to group disks into logical collections for
administrative convenience. A disk group and its components can be
moved as a unit from one host machine to another. disk## (such as
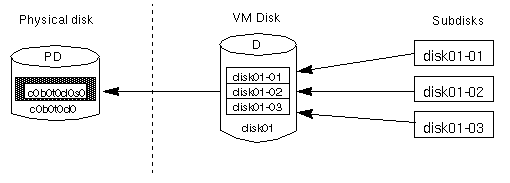
disk01), the default name for a subdisk is
disk##-##. So, for example, disk01-01
would be the name of the first subdisk on the VM disk named
disk01.Figure 4 Example of a Subdisk
A VM disk may contain multiple subdisks, but subdisks cannot overlap or share the same portions of a VM disk. The example given in Figure 5 shows a VM disk, with three subdisks, that is assigned to one partition.
Figure 5 Example of Three Subdisks Assigned to One Partition
Any VM disk space that is not part of a subdisk is considered to be free space, which can be used to create new subdisks.
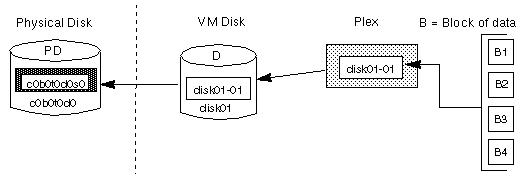
The subdisks in a concatenated plex do not necessarily have to be physically contiguous and can belong to more than one VM disk. Concatenation using subdisks that reside on more than one VM disk is also called spanning.
Figure 6 illustrates concatenation with one subdisk.
Figure 6 Example of Concatenation
Concatenation with multiple subdisks is useful when there is insufficient contiguous space for the plex on any one disk. Such concatenation can also be useful for load balancing between disks, and for head movement optimization on a particular disk.
Figure 7 shows how data would be spread over two subdisks in a spanned plex.
Since the first six blocks of data (B1 through
B6) consumed most or all of the room on the partition that
VM disk disk01 is assigned to, subdisk
disk01-01 is alone on VM disk disk01.
However, the last two blocks of data, B7 and
B8, take up only a portion of the room on the partition
that VM disk disk02 is assigned to. That means that the
remaining free space on VM disk disk02 can be put to other
uses. In this example, subdisks disk02-02 and
disk02-03 are currently available for some other disk
management tasks.
A volume can consist of up to 32 plexes, each of which contains one or more subdisks. In order for a volume to be usable, it must have at least one associated plex with at least one associated subdisk. Note that all subdisks within a volume must belong to the same disk group.
The Volume Manager uses the default naming conventions of
vol## for volumes and vol##-##
for plexes in a volume. Administrators are encouraged to select more
meaningful names for their volumes.
A volume with one plex (see Figure 8) contains a single copy of the data.
Figure 8 Example of a Volume with One Plex
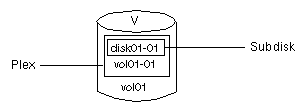
Note that volume vol01 in Figure
8 has the following characteristics:
vol01-01
disk01-01
disk01-01 is allocated from VM disk disk01
Figure 9 Example of a Volume with Two Plexes
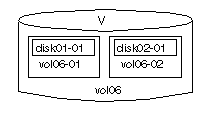
Note that volume vol06 in Figure
9 has the following characteristics:
vol06-01 and vol06-02
disk01 and disk02)
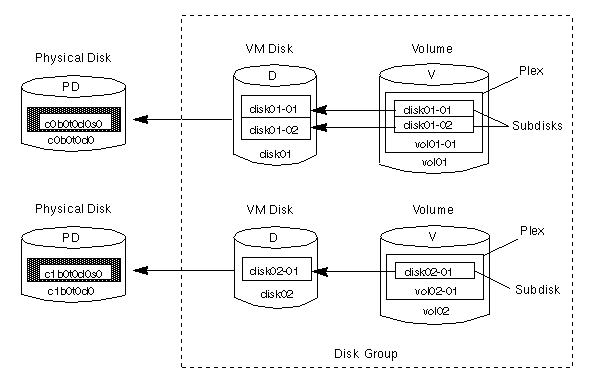
Figure 10 Example of a Volume in a Concatenated Configuration
disk01 and disk02).
disk01 has a volume with one plex and two subdisks and
disk02 has a volume with one plex and a single subdisk.Figure 11 Relationship Between VxVM Objexts
This section focuses on the Volume Manager's implementations of RAID. For a general description of disk arrays and the various levels of RAID, refer to "Disk Array Overview."
The Volume Manager supports the following levels of RAID:
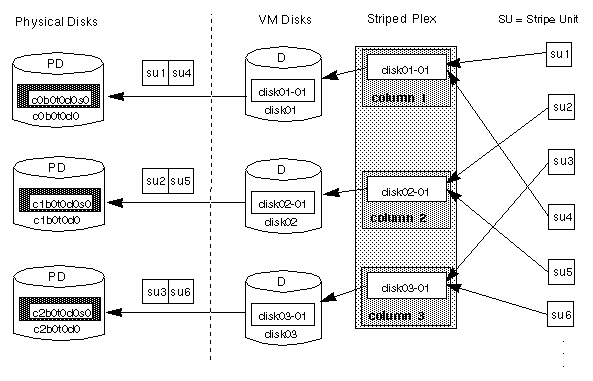
The subdisks are grouped into "columns," with each physical disk limited to one column. Each column contains one or more subdisks and can be derived from one or more physical disks. The number and sizes of subdisks per column can vary. Additional subdisks can be added to columns, as necessary.
Data is allocated in equal-sized units (called stripe units) that are interleaved between the columns. Each stripe unit is a set of contiguous blocks on a disk. The default stripe unit size is 64 kilobytes.
For example, if there are three columns in a striped plex and six stripe units, data is striped over three physical disks, as illustrated in Figure 12. The first and fourth stripe units are allocated in column 1; the second and fifth stripe units are allocated in column 2; and the third and sixth stripe units are allocated in column 3. Viewed in sequence, the first stripe begins with stripe unit 1 in column 1, stripe unit 2 in column 2, and stripe unit 3 in column 3. The second stripe begins with stripe unit 4 in column 1, stripe unit 5 in column 2, and stripe unit 6 in column 3. Striping continues for the length of the columns (if all columns are the same length) or until the end of the shortest column is reached. Any space remaining at the end of subdisks in longer columns becomes unused space.
Figure 12 Striping Across Three Disks (Columns)
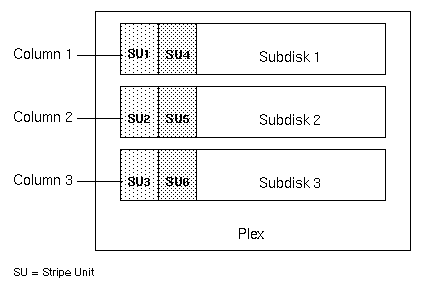
A stripe consists of the set of stripe units at the same positions across all columns. In Figure 12, stripe units 1, 2, and 3 constitute a single stripe.
Striping is useful if you need large amounts of data to be written to or read from the physical disks quickly by using parallel data transfer to multiple disks. Striping is also helpful in balancing the I/O load from multi-user applications across multiple disks.
Figure 13 Example of a Striped Plex with One Subdidk per Column
Although the example in Figure 13 shows three subdisks that consume all of the VM disks, it is also possible for each subdisk in a striped plex to take up only a portion of the VM disk, thereby leaving free space for other disk management tasks.
Figure 14 shows a striped plex with 3 columns containing subdisks of different sizes. Each column contains a different number of subdisks. There is one column per physical disk. Although striped plexes are usually created using a single subdisk from each of the VM disks being striped across, it is also possible to allocate space from different regions of the same disk or from another disk (if the plex is grown, for instance).
Figure 14 Example of a Striped Plex with Multiple Subdisks Per Column
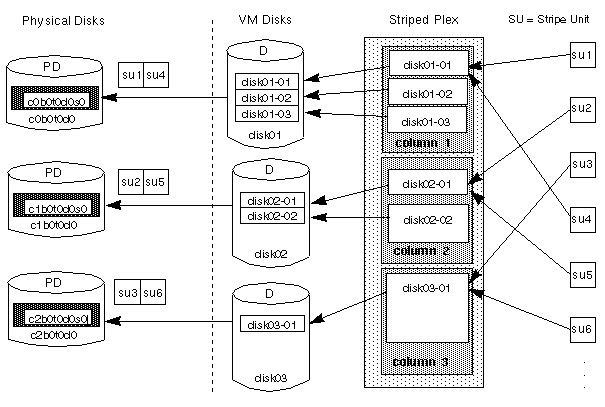
Figure 15 shows how a volume would look if it were set up for the simple striped configuration given in Figure 13.
Figure 15 Example of a Volume in a Striped Configuration

When striping or spanning across a large number of disks, failure of any one of those disks will generally make the entire plex unusable. The chance of one out of several disks failing is sufficient to make it worthwhile to consider mirroring in order to improve the reliability (and availability) of a striped or spanned volume.
For striping and mirroring to be effective together, the striped plex and its mirror must be allocated from separate disks. The layout type of the mirror can be concatenated or striped.
Although both mirroring (RAID-1) and RAID-5 provide redundancy of data, their approaches differ. Mirroring provides data redundancy by maintaining multiple complete copies of a volume's data. Data being written to a mirrored volume is reflected in all copies. If a portion of a mirrored volume fails, the system will continue to utilize the other copies of the data.
RAID-5 provides data redundancy through the use of parity (a calculated value that can be used to reconstruct data after a failure). While data is being written to a RAID-5 volume, parity is also calculated by performing an exclusive OR (XOR) procedure on data. The resulting parity is then written to the volume. If a portion of a RAID-5 volume fails, the data that was on that portion of the failed volume can be recreated from the remaining data and the parity.
Figure 16 Traditional RAID-5 Array
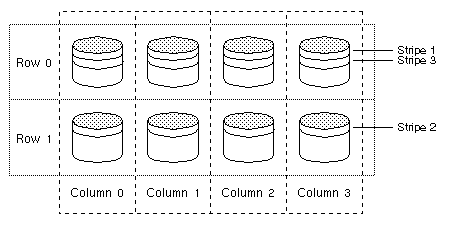
This traditional array structure was developed to support growth by adding more rows per column. Striping is accomplished by applying the first stripe across the disks in Row 0, then the second stripe across the disks in Row 1, then the third stripe across Row 0's disks, and so on. This type of array requires all disks (partitions), columns, and rows to be of equal size.
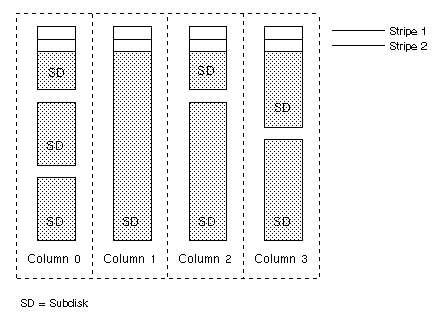
With the Volume Manager RAID-5 array structure, each column can consist of a different number of subdisks and the subdisks in a given column can be derived from different physical disks. Additional subdisks can be added to the columns, as necessary. Striping (described in "Striping (RAID-0)") is accomplished by applying the first stripe across each subdisk at the top of each column, then another stripe below that, and so on for the entire length of the columns. For each stripe, an equal-sized stripe unit is placed in each column. With RAID-5, the default stripe unit size is 16 kilobytes.
The left-symmetric layout stripes both data and parity across columns, placing the parity in a different column for every stripe of data. The first parity stripe unit is located in the rightmost column of the first stripe. Each successive parity stripe unit is located in the next stripe, left-shifted one column from the previous parity stripe unit location. If there are more stripes than columns, the parity stripe unit placement begins in the rightmost column again.
Figure 18 illustrates a left-symmetric parity layout consisting of five disks (one per column).
Figure 18 Left-Symmetric Layout
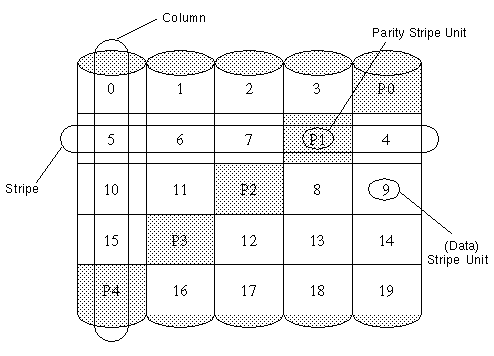
For each stripe, data is organized starting to the right of the parity stripe unit. In Figure 18, data organization for the first stripe begins at P0 and continues to stripe units 0-3. Data organization for the second stripe begins at P1, then continues to stripe unit 4, and on to stripe units 5-7. Data organization proceeds in this manner for the remaining stripes.
Each parity stripe unit contains the result of an exclusive OR (XOR) procedure performed on the data in the data stripe units within the same stripe. If data on a disk corresponding to one column is inaccessible due to hardware or software failure, data can be restored by XORing the contents of the remaining columns' data stripe units against their respective parity stripe units (for each stripe). For example, if the disk corresponding to the leftmost column in Figure 18 were to fail, the volume would be placed in a degraded mode. While in degraded mode, the data from the failed column could be recreated by XORing stripe units 1-3 against parity stripe unit P0 to recreate stripe unit 0, then XORing stripe units 4, 6, and 7 against parity stripe unit P1 to recreate stripe unit 5, and so on.
Logging is used to prevent this corruption of recovery data. A log of the new data and parity is made on a persistent device (such as a disk-resident volume or non-volatile RAM). The new data and parity are then written to the disks.
In Figure 19, the recovery of Disk B is dependent on the data on Disk A and the parity on Disk C having both completed. The diagram shows a completed data write and an incomplete parity write causing an incorrect data reconstruction for the data on Disk B.
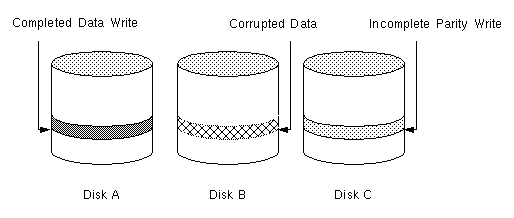
This failure case can be handled by logging all data writes before committing them to the array. In this way, the log can be replayed, causing the data and parity updates to be completed before the reconstruction of the failed drive takes place.
Logs are associated with a RAID-5 volume by being attached as additional, non-RAID-5 layout plexes. More than one log plex can exist per RAID-5 volume, in which case the log areas are mirrored.
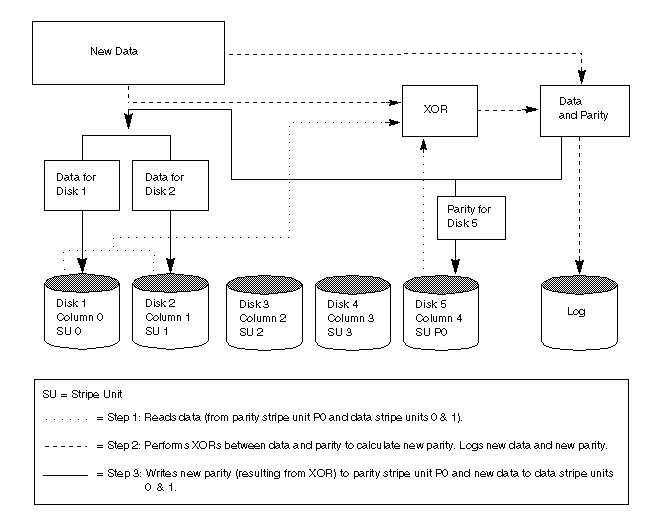
The read-modify-write sequence is illustrated in Figure 20.

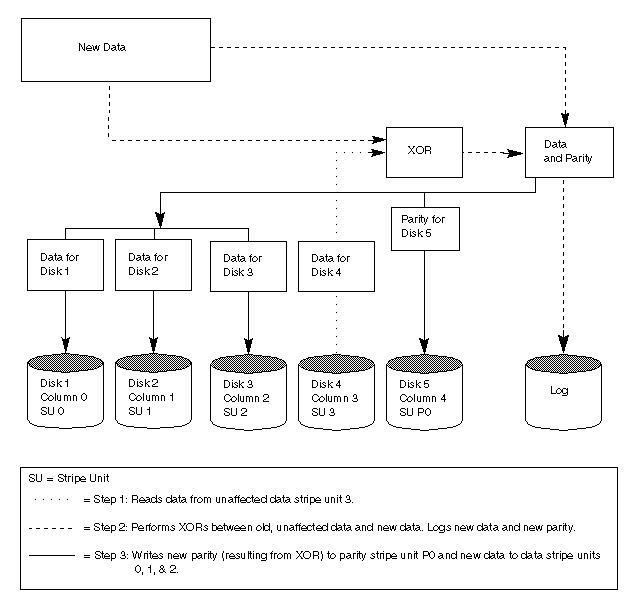
A reconstruct-write procedure consists of the following steps:
When a partial disk failure occurs (that is, a failure affecting only some subdisks on a disk), redundant data on the failed portion of the disk is relocated and the existing volumes comprised of the unaffected portions of the disk remain accessible.
The hot-relocation daemon, vxrelocd, is responsible for
monitoring VxVM for events that affect redundancy and performing
hot-relocation to restore redundancy. vxrelocd also
notifies the system administrator (via electronic mail) of failures and
any relocation and recovery actions. See the vxrelocd(1M)
manual page for more information on vxrelocd.
The vxrelocd daemon starts during system startup and
monitors the Volume Manager for failures involving disks, plexes, or
RAID-5 subdisks. When such a failure occurs, it triggers a
hot-relocation attempt.
A successful hot-relocation process involves:
vxdiskadm, or vxedit (as described in the
VERITAS Volume Manager User's Guide). Disks designated as
spares do not participate in the free space model and should not have
storage space allocated on them. When selecting space for relocation, hot-relocation preserves the redundancy characteristics of the VxVM object that the relocated subdisk belongs to. For example, hot-relocation ensures that subdisks from a failed plex are not relocated to a disk containing a mirror of the failed plex. If redundancy cannot be preserved using any available spare disks and/or free space, hot-relocation does not take place. If relocation is not possible, the system administrator is notified and no further action is taken.
When hot-relocation takes place, the failed subdisk is removed from the configuration database and VxVM takes precautions to ensure that the disk space used by the failed subdisk is not recycled as free space.
For information on how to take advantage of hot-relocation, refer to Chapter 2 and Chapter 3 of this guide.
rootdg), the resynchronization process takes
place when the system reboots.Not all volumes may require resynchronization after a system failure. Volumes that were never written or that were quiescent (i.e., had no active I/O) when the system failure occurred could not have had any outstanding writes and thus do not require resynchronization. The Volume Manager notices when a volume is first written and marks it as dirty. When a volume is closed by all processes or stopped cleanly by the administrator, all writes will have completed and the Volume Manager removes the dirty flag for the volume. Only volumes that are marked dirty when the system reboots require resynchronization.
The exact process of resynchronization depends on the type of volume.
RAID-5 volumes that contain RAID-5 logs can simply "replay" those
logs. If no logs are available, the volume is placed in
reconstruct-recovery mode and all parity is regenerated. For mirrored
volumes, resynchronization is achieved by placing the volume in
recovery mode (also called read-writeback recovery mode) and
resynchronizing all data in the volume in the background. This allows
the volume to be available for use while recovery is ongoing.
The process of resynchronization can be computationally expensive and can have a significant impact on system performance. The recovery process attempts to alleviate some of this impact by attempting to "spread out" recoveries to avoid stressing a specific disk or controller. Additionally, for very large volumes or for a very large number of volumes, the resynchronization process can take a long time. These effects can be addressed by using Dirty Region Logging for mirrored volumes, or by making sure that RAID-5 volumes have valid RAID-5 logs.
If DRL is not used and a system failure occurs, all mirrors of the volumes must be restored to a consistent state by copying the full contents of the volume between its mirrors. This process can be lengthy and I/O intensive; it may also be necessary to recover the areas of volumes that are already consistent.
DRL logically divides a volume into a set of consecutive regions. It keeps track of volume regions that are being written to. A dirty region log is maintained that contains a status bit representing each region of the volume. For any write operation to the volume, the regions being written are marked dirty in the log before the data is written. If a write causes a log region to become dirty when it was previously clean, the log is synchronously written to disk before the write operation can occur. On system restart, the Volume Manager will recover only those regions of the volume that are marked as dirty in the dirty region log.
Log subdisks are used to store the dirty region log of a volume that has DRL enabled. A volume with DRL has at least one log subdisk; multiple log subdisks can be used to mirror the dirty region log. Each log subdisk is associated with one of the volume's plexes. Only one log subdisk can exist per plex. If the plex contains only a log subdisk and no data subdisks, that plex can be referred to as a log plex. The log subdisk can also be associated with a regular plex containing data subdisks, in which case the log subdisk risks becoming unavailable in the event that the plex must be detached due to the failure of one of its data subdisks.
If the vxassist command is used to create a dirty region
log, it creates a log plex containing a single log subdisk, by default.
A dirty region log can also be created "manually" by creating a log
subdisk and associating it with a plex. In the latter case, the plex
may contain both a log subdisk and data subdisks.
Only a limited number of bits can be marked dirty in the log at any time. The dirty bit for a region is not cleared immediately after writing the data to the region. Instead, it remains marked as dirty until the corresponding volume region becomes the least recently used. If a bit for a given region is already marked dirty and another write to the same region occurs, it is not necessary to write the log to the disk before the write operation can occur.
The enhanced interfaces for redo logs allow the database software to inform VxVM when a volume is to be used as a redo log. This allows VxVM to modify the volume's DRL behavior to take advantage of the access patterns. Since the improved recovery time depends on dirty region logs, redo log volumes should be configured as mirrored volumes with dirty region logs.
root and stand file
systems and the initial swap device under Volume Manager
control -- this is called rootability. The root disk (that is, the disk containing the root file
system) can be put under VxVM control through the process of
encapsulation, which converts existing
partitions on that disk to volumes. Once under VxVM control, the
root and swap devices appear as volumes and
provide the same characteristics as other VxVM volumes. A volume that
is configured for use as a swap area is referred to as a swap
volume; a volume that contains the root file system is referred to
as a root volume; and a volume that contains the stand file
system is referred to as a stand volume.
It is possible to mirror the rootvol, swapvol, and
standvol volumes, which are
required for a successful boot of the system.
This provides complete redundancy and recovery capability in the event
of disk failure. Without Volume Manager rootability, the loss of the root, swap, or stand partition would prevent
the system from being booted from surviving disks.
Mirroring disk drives critical to booting ensures that no single disk
failure will leave the system unusable. Therefore, a suggested
configuration would be to mirror the critical disk onto another
available disk (using the vxdiskadm command). If the disk containing the
root, stand, and swap partitions
fails, the system can be rebooted from the disk containing the root
mirror. For more information on mirroring the boot (root) disk and
system recovery procedures, see the "Recovery" appendix.
stand file system, and swap area need to be
available for use very early in the boot procedure (which is long
before user processes can be run to load the Volume Manager
configuration and start volumes). The root,
stand, and swap device configurations must be
completed prior to starting the Volume Manager. Starting VxVM's
vxconfigd daemon as part of the init process
is too late to configure volumes for use as a root or
swap device.
To circumvent this restriction, the mirrors of the
rootvol, standvol, and swapvol
volumes can be accessed by the system during startup. During startup,
the system sees the rootvol, standvol, and
swapvol volumes as regular partitions and accesses them
using standard partition numbering. Therefore, rootvol,
standvol, and swapvol volumes must be created
from contiguous disk space that is also mapped by a single partition
for each. Due to this restriction, it is not possible to stripe or span
the primary plex (that is, the plex used for booting) of a
rootvol, standvol, or swapvol
volume. Similarly, any mirrors of these volumes that might need to be
used for booting cannot be striped or spanned.
rootvol, standvol, and swapvol volumes differ from other volumes in
that they have very specific restrictions on the configuration of the
volumes:
rootvol) must exist in the default
disk group, rootdg. Although other volumes named
rootvol may be created in disk groups other than
rootdg, only the rootvol in
rootdg can be used to boot the system.
rootvol volume has a specific minor device number:
minor device 0. Similarly, swapvol has minor device number
1.
rootvol, standvol, and
swapvol devices will have "overlay" partitions created
for them. An "overlay" partition is one that exactly encompasses the
disk space occupied by the restricted mirror. During boot (before the
rootvol, standvol,
and swapvol volumes are fully configured), the default
volume configuration uses the overlay partition to access the data on
the disk. (See "Booting With Root
Volumes.")
rootvol device for performance reasons, you cannot stripe
the primary plex or any mirrors of rootvol that may be
needed for system recovery or booting purposes if the primary plex
fails.
rootvol, standvol, and
swapvol cannot be spanned or contain a primary plex with
multiple non-contiguous subdisks.
rootvol, standvol, and
swapvol cannot be Dirty Region
Logging volumes.
root and swap.
This makes it easier to convert these from volumes back to regular disk
partitions (during an operating system upgrade, for example).
vxconfigd
vxiod
vxconfigd) is
responsible for maintaining Volume Manager disk and disk group
configurations. vxconfigd communicates configuration
changes to the kernel and modifies configuration information stored on
disk. vxconfigd must be running before Volume Manager
operations can be performed. vxconfigd is invoked by startup scripts during the boot procedure.To determine whether the volume daemon is enabled, enter the following command:
vxdctl modeThe following message appears if
vxconfigd is both running and enabled:
mode: enabledThe following message appears if
vxconfigd is running, but not enabled:
mode: disabledTo enable the volume daemon, enter the following:
vxdctl enableThe following message appears if
vxconfigd is not running:
mode: not-runningIf the latter message appears, start
vxconfigd as follows:
vxconfigdOnce started,
vxconfigd automatically becomes a background
process.
By default, vxconfigd issues errors to the console.
However, vxconfigd can be configured to log errors to a
log file. (See Appendix A, "Volume
Manager Error Messages" for further information.)
For more information on the vxconfigd daemon, refer to the
vxconfigd(1M) and vxdctl(1M) manual pages.
vxiod) allows for some extended I/O operations without
blocking calling processes.
For more detailed information about vxiod, refer to the
vxiod (1M) manual page.
vxiod daemons are started at system boot time. There are
typically several vxiod daemons running at all times.
Rebooting after your initial installation should start
vxiod.
Verify that vxiod daemons are running by typing the following command:
vxiodSince
vxiod is a kernel thread and is not visible to users
via ps, this is the only way to see if any
vxiods are running.
If any vxiod daemons are running, the following should be
displayed:
10 volume I/O daemons runningwhere 10 is the number of
vxiod daemons currently
running. If no vxiod daemons are currently running,
start some by entering the command:
vxiod set 10where 10 may be substituted by the desired number of
vxiod
daemons. It is generally recommended that at least one
vxiod daemon exist per CPU.
vxdiskadm) provides a menu-driven
interface for performing disk and volume administration functions.
Volume Manager objects created by one interface are fully inter-operable and compatible with those created by the other interfaces.
Performing I/O to disks is a slow process because disks are physical devices that require time to move the heads to the correct position on the disk before reading or writing. If all of the read or write operations are done to individual disks, one at a time, the read-write time can become unmanageable. Performing these operations on multiple disks can help to reduce this problem.
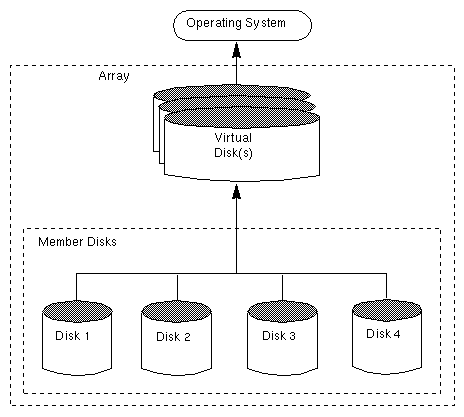
A disk array is a collection of disks that appears to the system as one or more virtual disks (also referred to as volumes). The virtual disks created by the software controlling the disk array look and act (to the system) like physical disks. Applications that interact with physical disks should work exactly the same with the virtual disks created by the array.
Data is spread across several disks within an array, which allows the disks to share I/O operations. The use of multiple disks for I/O improves I/O performance by increasing the data transfer speed and the overall throughput for the array.
Figure 23 illustrates a standard disk array.
Several levels of RAID exist. These are introduced in the following sections.
RAID-2 deals with error detection, but does not provide error correction. RAID-2 also requires large system block sizes, which limits its use.
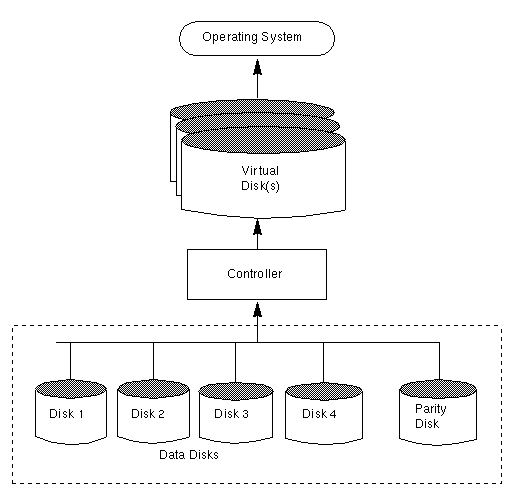
Figure 24 illustrates a RAID-3 disk array.
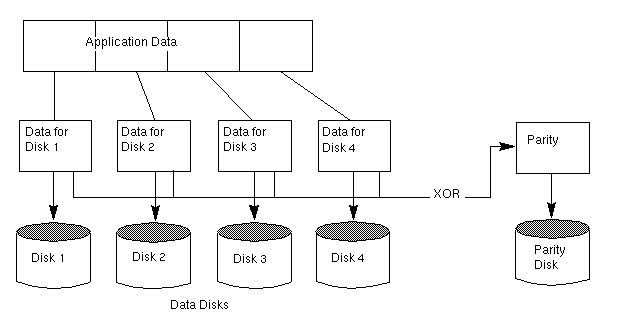
The user data is striped across the data disks. Each stripe on the parity disk contains the result of an exclusive OR (XOR) procedure done on the data in the data disks. If the data on one of the disks is inaccessible due to hardware or software failure, data can be restored by XORing the contents of the remaining data disks with the parity disk. The data on the failed disk can be rebuilt from the output of the XOR process.
RAID-3 typically uses a very small stripe unit size (also historically known as a stripe width), sometimes as small as one byte per disk (which requires special hardware) or one sector (block) per disk.
Figure 25 illustrates a data write to a RAID-3 array.
Figure 25 Data Writes to RAID-3
The parity disk model uses less disk space than mirroring, which uses equal amounts of storage capacity for the original data and the copy.
The RAID-3 model is often used with synchronized spindles in the disk devices. This synchronizes the disk rotation, providing constant rotational delay. This is useful in large parallel writes.
RAID-3 type performance can be emulated by configuring RAID-5 (described later) with very small stripe units.
An array attempts to provide the highest rate of data transfer by spreading the I/O load as evenly as possible across all the disks in the array. In RAID-3, the I/O load is spread across the data disks, as shown in Figure 25, and each write is executed on all the disks in the array. The data in the data disk is XORed and the parity is written to the parity disk.
RAID-4 maps data and uses parity in the same manner as RAID-3, by striping the data across all the data disks and XORing the data for the information on the parity disk. The difference between RAID-3 and RAID-4 is that RAID-3 accesses all the disks at one time and RAID-4 accesses each disk independently. This allows the RAID-4 array to execute multiple I/O requests simultaneously (provided they map to different member disks), while RAID-3 can only execute one I/O request at a time.
RAID-4's read performance is much higher than its write performance. It performs well with applications requiring high read I/O rates. RAID-4 performance is not as high in small, write-intensive applications.
The parity disk can cause a bottleneck in the performance of RAID-4. This is because all the writes that are taking place simultaneously on the data disks must each wait its turn to write to the parity disk. The transfer rate of the entire RAID-4 array in a write-intensive application is limited to the transfer rate of the parity disk.
Since RAID-4 is limited to parity on one disk only, it is less useful than RAID-5.
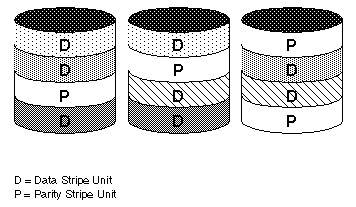
Figure 26 illustrates parity locations in a RAID-5 array configuration. Every stripe has a column containing a parity stripe unit and columns containing data. The parity is spread over all of the disks in the array, reducing the write time for large independent writes because the writes do not have to wait until a single parity disk can accept the data.
Figure 26 Parity Locations in a RAID-5 Model
For additional information on RAID-5 and how it is implemented by the Volume Manager, refer to "Volume Manager and RAID-5."