|
|
This section describes how to set up a UnixWare 7 Release 7.2 system to route packets from one network to another.
A TCP/IP network usually interconnects a number of hosts. Your UnixWare 7 Release 7.2 host is connected to a TCP/IP network via a hardware network interface. Individual TCP/IP networks are in turn interconnected via IP routers. IP routers forward IP packets from one TCP/IP network to another and exchange routing information with each other to deliver packets across a number of networks. Other types of routers may forward traffic for protocol families other than TCP/IP.
If all of the hosts at your site are connected to a single TCP/IP network that is not interconnected with any other TCP/IP networks, an IP router is unnecessary. If your site comprises many TCP/IP networks, or if you want to interconnect your network with other TCP/IP networks or the Internet, you must configure the interconnections with IP routers so that all hosts can communicate. ``Planning a routing layout'' introduces the considerations that you should take into account when implementing routing on your networks.
Many types of machines may serve as IP routers. A number of vendors offer machines dedicated entirely to the function of IP routing. A system may act both as a host (offering network services such as remote login) and a router.
The IP routing mechanisms consist of:
If you use static routing, you maintain the routing table manually using the route(1Mtcp) command. Static routing is practical for a single network communicating with one or two other networks where the configuration rarely changes. However, as your network begins to communicate with more networks, the number of gateways increases as does the amount of time and effort required to maintain the routing table manually.
If you use dynamic routing, routing daemons running on the routers continuously exchange routing information and update the routing table automatically. Dynamic routing is suitable for complex multiply connected networks where the configuration may change frequently.
A router can build and maintain a dynamic routing table by running a routing daemon such as routed(1Mtcp) or gated(1Mtcp). A routing daemon manages the routing table by exchanging routing information with gateways and other routers. When routed runs on a router, it broadcasts its routing table and listens for broadcasts from other directly connected routers. It continually updates its routing table based on those broadcasts. A routing daemon that both broadcasts its routing tables and listens for broadcasts from other routers is termed ``active mode''. (In fact, it is now usual to use multicasting rather than broadcasting when exchanging routing information. However, this does not change the discussion of router configuration significantly.)
You can also create a mixture of static and dynamic routing on your networks. However, any static routes that you create are not advertised to other routers and are not updated by the routing daemons.
A routing daemon can also run on a host that itself is not a router. In this case, the daemon is configured to listen for broadcasts and update its local routing table; it does not broadcast to other machines. This is termed ``passive mode''.
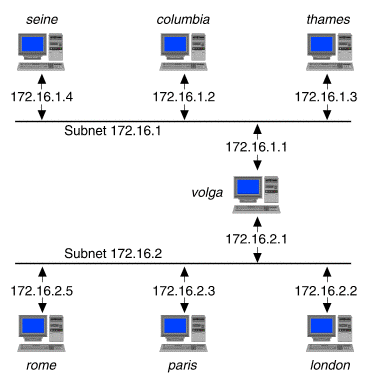
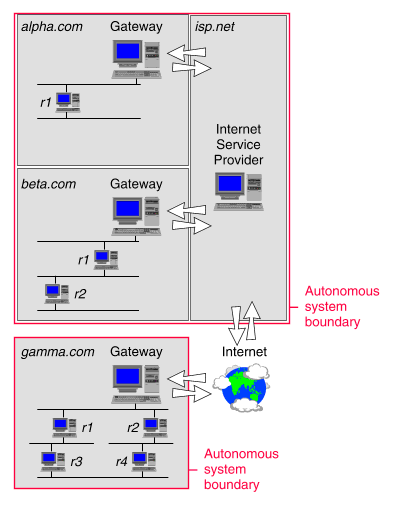
When a machine can send an IP packet to another machine without going through a third machine, the route the packet will travel is said to be a ``direct route''. The selection of that route is called ``direct routing''. In ``Example internetwork'', the machine columbia can trace a direct route to the machines seine, thames and volga on the 172.16.1 network. columbia cannot reach rome, london or paris directly.
Example internetwork
When a machine wishing to send an IP packet to a second machine must send that packet through a third machine, the route the packet will travel is said to be an ``indirect route'' and the selection of the intermediary machine is called ``indirect routing''. The intermediary machine, a router, has connections to more than one network and is said to provide a gateway between the networks. Therefore, a router may also be called a ``network gateway''. In ``Example internetwork'', the machine volga is a network gateway between the 172.16.1 network and the 172.16.2 network. If the machine seine needs to send an IP packet to paris, it must send the packet to volga, which forwards the packet to paris.
The above example is a simple but common scenario, however, sometimes the source and destination hosts can be several networks, and thus routers, away from each other.
Every UnixWare system running TCP/IP has a network routing table which is stored in the operating system kernel. This table consists of a series of entries, and each entry consists of multiple fields.
The fields of interest to this discussion are:
The following procedure shows how packets are routed to a system connected directly to the local network. See ``Example internetwork'', for an illustration of the networks described in this example.
| Destination | Netmask | Gateway | Interface |
|---|---|---|---|
| 172.16.2.0 | 255.255.255.0 | volga | en0 |
| 172.16.1.0 | 255.255.255.0 | local | en0 |
| Default | Not applicable | volga | en0 |
In this example, the netmask 255.255.255.0 applied to the IP address 172.16.1.4 results in the network address 172.16.1.0. As you can see, the result matches the second destination in the routing table. (If no match is found, thames uses the default entry.)
The following procedure shows how packets are routed to a system not connected directly to the local network. See ``Example internetwork'', for an illustration of the networks described in this example.
| Destination | Netmask | Gateway | Interface |
|---|---|---|---|
| 172.16.2.0 | 255.255.255.0 | volga | en0 |
| 172.16.1.0 | 255.255.255.0 | local | en0 |
| default | Not applicable | volga | en0 |
As illustrated by ``Direct routing example'', and ``Indirect routing example'', the successful routing of IP packets depends on the contents of the kernel routing table. Entries in the kernel routing table are created, removed, and changed:
As shown in ``Understanding the routing table'', the kernel routing table usually includes entries for a few networks and also includes a default entry. Any packets addressed to networks not found in the kernel routing table are sent to the gateway machine listed in the default entry. This provides an important efficiency in that every machine need not list in its kernel routing table every network its users may need to reach. Instead, a machine need only know about those networks nearby. The router indicated by the default route can be expected to know about networks beyond this group.
On the Internet, this concept is standardized by the registration of autonomous systems (AS). A group of networks on the Internet that are under common administration is considered to be an autonomous system. Autonomous systems must be registered with an Network Information Center or NIC.
For example, all of the networks that form the internetwork of a single business could constitute an autonomous system. In such a situation, a single machine is the gateway between the autonomous system and any networks outside the autonomous system. This gateway to the outside of the autonomous system is called an ``exterior router'' because it is expected to communicate with routers on networks outside of the autonomous system. Any additional routers within the autonomous system are called ``interior routers'' and are expected to communicate only with routers on networks within the autonomous system.
This distinction between interior and exterior routers is important in the selection of routing protocols to be run to maintain the kernel routing tables on your systems. To improve the efficiency of the exchange of network information between routing daemons, some protocols are designed specifically for exchanging interior routing information and some are designed specifically for exchanging exterior routing information.
Routing daemons initialize and dynamically maintain the kernel routing table by communicating with daemons on other systems to exchange routing information such as what networks are known by the machine on which the daemon is running. Routing daemons exchange information according to routing protocols. The main difference between routing daemons is in the routing protocols that they understand.
UnixWare supports the following routing daemons:
``Routing protocols and daemons'' lists the following information about the routing protocols supported by SCO TCP/IP:
Routing protocols and daemons
| Protocol |
IP
version |
Interior/
exterior |
Routing
daemon |
Router/
non-router |
Network
topology |
|---|---|---|---|---|---|
| Router discovery | IPv4 | Not applicable | routed and gated | Both | Simple |
| RIPv1 | IPv4 | Interior | routed and gated | Both | Simple |
| RIPv2 | IPv4 | Interior | routed and gated | Both | Simple |
| NDP | IPv6 | Not applicable | ndpd-host and ndpd-router | Both | Simple |
| RIPng | IPv6 | Interior | ndpd-router and gated | Both | Simple |
| OSPF | IPv4 | Interior | gated | router | Simple or complex |
| EGP | IPv4 | Exterior | gated | router | |
| BGP | IPv4 | Exterior | gated | router | |
| BGP4+ | IPv6 | Exterior | gated | router |
This section introduces some of the factors that you should take into account when designing the layout and connectivity of your organization's networks. It is by no means an exhaustive discussion of this topic, nor does it cover the features or configuration of the router hardware solutions that are available from third-party vendors.
Before starting to configure routers for your network, you need to decide on the number of routers that you will need and to choose the type of routing (static or dynamic) that they will use.
The number of routers that you need to configure depends on the number of networks you want to interconnect, on how you want to connect the networks, and on the level of activity on the connected networks.
For example, consider the networks shown in ``Multiple networks connected by multiple routers''.
Multiple networks connected by multiple routers
Suppose that systems on the rivers and cities networks need to communicate with each other and with the places network. To connect the rivers network directly to the places network, you would use a single router (nile). To connect the cities network directly to the places network, you could configure another router (cairo). Assuming the proper routes are defined, the systems on all three networks can communicate. However, if the places network is very busy, communication between the rivers and cities networks may suffer unacceptable delays.
A more cost-effective solution would be to use a single router that is connected directly to all three networks as shown in ``Multiple networks connected by a single router''.
Multiple networks connected by a single router
In general, the number of networks you connect through a single router is limited by the number of network adapter cards that the routing system can support.
Several problems potentially arise with using a single router between multiple networks:
An important consideration when planning your organization's network layout is how many separate internal networks are needed. If there are sufficient network hosts (say, more than 30), it is common practice to assign separate networks to individual departments. This concentrates traffic on the networks where it is relevant, and prevents it loading other networks. If you group server machines on the same network as the host machines that will access them, you can avoid creating unnecessary traffic on other networks and reduce load on the intermediate routers. These departmental servers can provide access to networked filesystems, user mailboxes, departmental web pages, and directory services.
If a server machine must be accessed by hosts in two or more networks, consider making this machine directly accessible to these networks by configuring it with separate interfaces to each one. A centralized server can provide access to the same facilities as a departmental server. Additionally, it is suitable for hosting an organization's web server and other intranet services.
Note that you do not have to configure the server as a router to make it accessible from the locally attached networks, even if it does have more than one network interface. In fact, it may be inadvisable to make a server also function as a router as some portion of its processing power must inevitably be expended routing traffic between the attached networks. If the server also runs a routing daemon, configure this to run in quiet mode if the server will not act as a router. If possible, use a non-server machine as a router between the networks.
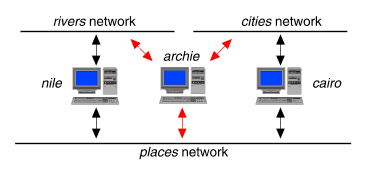
Non-routing server connected to multiple networks
``Non-routing server connected to multiple networks'' shows a server named archie connected directly via its three network interfaces to the three networks introduced in the previous examples. Forwarding of IP datagrams has been disabled on archie, so that only cairo, and nile will act as routers between the networks. Hosts on each of the three networks have direct access to archie without going through an intermediate router.
Once you have chosen a network topology and its connectivity, you must decide on the type of routing to configure: static or dynamic.
Use static routing if your networks are small-scale, simply connected (no more than one router per network), or their configuration rarely changes.
Use dynamic routing if your networks are large-scale, multiply connected, or their configuration may change frequently.
You can also use a combination of static and dynamic routing. For example, you might configure a static definition on a router that leads to an otherwise unconnected network, while allowing routes to networks with complex topologies to be updated by routing daemons. Any static routes that you create are not advertised to other routers, and they are not updated by the routing daemons.
If you configure dynamic routing, choose the routing daemon according to the type of router (interior or exterior) and the protocols that it must support:
``Examples of router configuration'' shows examples of how routers might be configured in three organizations:
Examples of router configuration
The procedure that you should follow to configure a system for IP routing depends on whether it will act as a non-routing host, as an internal router or as a gateway for an autonomous system, and on which IP protocol it must support:
| System type | IP version | Procedure |
|---|---|---|
| Non-routing host | IPv4 only | ``Configuring a non-routing IPv4 host'' |
| Non-routing host | IPv6 only | ``Configuring a non-routing IPv6 host'' |
| Non-routing host | IPv4 and IPv6 | ``Configuring gated on a non-routing host'' and ``Configuring a non-routing IPv6 host'' |
| Internal router | IPv4 only | ``Configuring an IPv4 router'' |
| Internal router | IPv6 only | ``Configuring an IPv6 router'' |
| Internal router | IPv4 and IPv6 | ``Configuring gated on a router'' and ``Configuring an IPv6 router'' |
| Gateway | IPv4 only | ``Configuring an external router'' and ``Configuring gated on a router'' |
| Gateway | IPv6 only | ``Configuring an IPv6 router'' |
| Gateway | IPv4 and IPv6 | ``Configuring an external router'', ``Configuring gated on a router'' and ``Configuring an IPv6 router'' |
An internal IPv4 router is normally configured to advertise routes by running the routed routing daemon.
A router must be configured to forward packets. You can use the Network Configuration Manager to configure a machine as a router. Alternatively, you can use the inconfig(1Mtcp) command to do this:
If ipforwarding is turned on, the router will forward packets that it receives on one network interface to a destination that is reachable through another of its network interfaces.
If ipsendredirects is turned on, and the router forwards an incoming packet to another router out of the same interface on which it received the packet, it will send an Internet Control Message Protocol (ICMP) redirect error to the originator of the packet. The ICMP redirect updates the routing table of the originating host with information about the router that it should be using. In this way, hosts that are configured with a single default route can gradually learn about other routers.
If you do not want the router to forward source-routed datagrams, enter:
inconfig ipnonlocalsrcroute 0
If you want the router to forward source-routed datagrams, enter:
inconfig ipnonlocalsrcroute 1
Either routed or gated can be used to implement version 2 of the RIP protocol.
If you need also to use any of the OSPF, EGP, or BGP protocols in conjunction with RIP, you must use gated to implement RIP.
To configure the routed routing daemon on a router:
sort-key:/usr/sbin/in.routed:/usr/sbin/in.gated:y:::For more information about /etc/inet/gateways and routed, see routed(1Mtcp). For more information about the /etc/inet/config file, see config_inet(4tcp).
See also:
Configure a gateway for an autonomous system as follows:
The behavior of the gated routing daemon is configured using the file /etc/inet/gated.conf. To create this file, you will need the following information:
| Protocol | Filename |
|---|---|
| EGP | /etc/inet/gated.egp |
| BGP | /etc/inet/gated.bgp |
| BGP4+ | /etc/inet/gated.bgp4+ |
| RIP | /etc/inet/gated.rip |
| RIPng | /etc/inet/gated.ripng |
| OSPF | /etc/inet/gated.ospf |
Read the gated.conf(4tcp) manual page carefully while examining these files. Using the provided files as a model, copy the appropriate statements into the gated.conf file and tailor them to your site requirements. Note that comments in the configuration file begin with a number sign (#) and statements are terminated with a semicolon (;). Also, the options, interface, definition, protocol, route, and control statements must be specified in the order just listed.
When first enabling gated, you should execute it with the -n option to ensure that it does not modify the kernel routing table. To do this:
sort-key:/usr/sbin/in.gated::y:/etc/inet/gated.conf:-n:
sort-key:/usr/sbin/in.gated::y:/etc/inet/gated.conf::
In the following examples, other routers and non-routing hosts that use the routed routing daemon would be able to interoperate successfully with the routers running gated.
This would be the /etc/inet/gated.conf file for the router volga shown in ``Example internetwork'':
   # Turn off unwanted protocols
   #
   bgp off ;
   egp off ;
   ospf off ;
   #
   # Turn on RIPv2
   #
   rip on {
   	broadcast ;
   	interface all version 2 multicast ;
   } ;
By default, gated advertises all directly connected networks
so no configuration statements are needed to have it announce the
subnets 172.16.1 and 172.16.2 to each other. As RIP version 1
is the default protocol, it is necessary to turn version 2 on explicitly.
As a more complicated example, assume that routers to other networks exist on the subnet 172.16.1 and that subnet 172.16.2 is a branch of this network through the single router volga. The entries in /etc/inet/gated.conf then need to configure gated to announce routes learned via RIP on subnet 172.16.1:
   # Turn off unwanted protocols
   #
   bgp off ;
   egp off ;
   ospf off ;
   #
   # Turn on RIPv2
   #
   rip on {
   	broadcast ;
   	interface all version 2 multicast ;
   } ;
   #
   # Use RIP to announce all routes learn via RIP that are
   # available via subnet 172.16.1 to subnet 172.16.2
   #
   export proto rip interface 172.16.2.1 { # where to announce
   	proto rip interface 172.16.1.1 { # what to announce
                   all ; # do not restrict
   	} ;
   } ;
In this example, consider the following /etc/inet/gated.conf
entries for an external gateway that is connected to the internal subnet
172.16.1 on the network 172.16 via an interface
with IP address 172.16.1.12:
   # Generate a default route when an EGP neighbor is acquired
   #
   options gendefault;
   #
   # Define our autonomous system ID
   #
   autonomoussystem 4711 ;
   #
   # Turn off unwanted protocols
   #
   egp off ;
   ospf off ;
   #
   # Turn on RIPv2 multicasting on the local subnet
   #
   rip on {
   	broadcast ;
   	interface 172.16.1.12 version 2 multicast ;
   } ;
   #
   #Turn on BGP
   #
   bgp on {
   #	Define our BGP neighbors
   	group type external peeras 519 {
   		peer 128.212.64.1;
   	} ;
   	group type external peeras 431 {
   		peer 128.210.60.1;
   	} ;
   } ;
   #
   # Announce the entire 172.16 network using BGP to autonomous system 519
   #
   export proto bgp as 519 {
   	proto direct {
   		172.16.0.0 metric 0 ;
   	} ;
   } ;
   #
   # Announce the default route out of 172.16 using RIP to 172.16.1.0
   #
   export proto rip interface 172.16.1.12 {
   	proto default {
   		all metric 4 ;
   	};
   };
The following two examples show how gated
can be configured to generate a general route from information
supplied about several more specific routes. The way in which
gated does this in UnixWare is different from in previous
releases. Route aggregation is not performed automatically.
You must configure it explicitly using the aggregate statement
in the
gated.conf(4tcp)
file.
See
``Route aggregation''
for a full description of
route aggregation and the
syntax of the aggregate statement.
This example is for a router with three network interfaces where the two 10 subnets are to be advertised on the 172.16.244 network:
   # Router with interfaces 10.0.0.1, 10.65.0.1, and 172.16.244.1
   #
   rip yes ;
   #
   # Turn off unused protocols
   #
   ospf no;
   bgp no;
   egp no;
   #
   static {
   	host 10.0.0.1 gateway localhost retain ;
   	host 10.65.0.1 gateway localhost retain ;
   	host 172.16.244.1 gateway localhost retain ;
   } ;
   #
   # Aggregate the 10 net so that both 10.0.0.1 and 10.65.0.1
   # are advertised via 172.16.244.1
   #
   aggregate 10.0.0.0 mask 255.0.0.0 {
   	proto direct { 10.0.0.0 mask 255.0.0.0; };
   };
   #
   export proto rip {
   	proto direct { all; };
   	proto rip { all; };
   	proto aggregate {
   		all metric 1;
   	};
   };
The next example shows how a router can aggregate and advertise
a route to two subnetted class B networks:
   # Router with interfaces 172.16.4.233, 172.16.246.17 and 172.16.246.33
   #
   # Subnet 172.16.4/24 has netmask 255.255.255.00
   # Subnet 172.16.246.16/28 has netmask 255.255.255.240 (subnetted class B)
   # Subnet 172.16.246.32/28 has netmask 255.255.255.240 (subnetted class B)
   #
   rip yes ;
   #
   # Turn off unused protocols
   #
   ospf no;
   bgp no ;
   egp no ;
   #
   static {
   	host 172.16.4.233  gw localhost retain ;
   	host 172.16.246.17 gw localhost retain ;
   	host 172.16.246.33 gw localhost retain ;
   } ;
   #
   # Aggregate 172.16.246.0/24 from the directly attached
   # subnets 172.16.246.16/28 and 172.16.246.32/28, and
   # advertise via 172.16.4.233
   #
   aggregate 172.16.246.0 mask 255.255.255.0 {		# /24
   	proto direct {
   		172.16.246.16 mask 255.255.255.240;	# /28
   		172.16.246.32 mask 255.255.255.240;	# /28
   	};
   };
   #
   export proto rip metric 2 {
   	proto aggregate {
   		172.16.246.0 mask 255.255.255.0;	# /24
   	};
   };
After you configure one or more routers between the local network and other networks, you must configure the routing tables of the hosts on the local network so that they can send packets to those networks. This is done using the route command or a routing daemon, usually routed.
The non-routing host uses the information you supply in the route command to build or update its internal routing table. Alternatively, it can use a routing daemon to create a routing table based on broadcasts received from the router(s). The host uses the table to find the appropriate router (``next hop'') to the destination to which it is trying to send packets.
Either the route command or a routing daemon such as routed must be run on the client every time TCP/IP is started. You must modify the client's Internet services configuration file, /etc/inet/config to ensure that either the command or the daemon is run automatically after booting (see config_inet(4tcp)). You can edit the configuration file to specify different kinds of routing behavior, as described below:
See ``Running a routing daemon on a non-routing host'' for details.
It is also possible to configure a non-routing host to find a suitable default route dynamically using router discovery. Both routed and gated support this.
If there are only one or two routers connected to a local network, you can make clients direct all outward bound packets to one router. This is known as the default route. When this router receives packets which it needs to redirect to another router on the same subnet, it sends ICMP routing-redirect messages to the source host. This allows the hosts to adjust their routing tables dynamically so that they will subsequently use the correct router.
This approach yields a limited advantage in terms of performance over running a routed or gated routing daemon on each host, but it is unsuitable in an environment where subnets are only connected by bridges. This is because bridges do not generate ICMP routing-redirect messages. Further, if the default route goes down, there is no way to maintain service except to alter the routing tables on each host manually using the route(1Mtcp) command.
You can also use the route to prime the hosts' routing tables with static routes. Once you do this, you no longer have dynamic routing. This may not be the best choice if it is possible that you may add other routers or change the network topology in the future.
To specify a default route:
sort-key:/usr/sbin/route::y::add default router:Substitute the IP address or host name of the router on your local network for router. Ensure that the flag field contains the value ``y'' to enable the entry.
sort-key:/usr/sbin/in.routed:/usr/sbin/in.gated:n:::
If your client is on the eng network, the entry for /usr/sbin/route in its /etc/inet/config file would be:
sort-key:/usr/sbin/route::y:add default jekyll:If your client is on the mktg network, the entry in /usr/sbin/route would be:
sort-key:/usr/sbin/route::y:add default hyde:In both examples, the argument default indicates that all communication directed outside the local network from your client will be directed through the router.
If a host is on a local subnet that has more than one router, you may want to specify static routes that should be used.
For example, consider the networks shown in ``Choosing specific routers''.
Choosing specific routers
In this example, two routers, nile and cairo, are available on the local places network. Your system needs to communicate regularly with networks named rivers and cities. The router nile is directly connected to the rivers network and cairo is directly connected to the cities network. To specify explicitly the routes that traffic from your system should follow to these networks, you would add the following entries to /etc/inet/config:
   sort-keya:/usr/sbin/route::y:add -hopcount 1 rivers nile:
   sort-keyb:/usr/sbin/route::y:add -hopcount 1 cities cairo:
These entries set up your system so that it sends messages intended for different networks through different routers, rather than sending all traffic through the same router.
If all of your routes are statically defined in /etc/inet/config, you can disable the routed daemon entry in /etc/inet/config to improve system performance.
If the rivers network also contained one or more connections to other networks, such as the Internet, you could also add an entry for a default route:
sort-key:/usr/sbin/route::y:add default nile:This would handle traffic to all other networks. For more information, see route(1Mtcp).
By running a routing daemon on a non-routing host, you can make it update its routing tables based on broadcasts from routers.
If the router is running the routed daemon, routed listens for broadcasts from other routers and gateways and continually updates its routing tables based on the information in those broadcasts. It also broadcasts its own routing tables so that other machines can use them for updating their own routing tables.
Because routed on a router both broadcasts its own routing table and listens for broadcasts from other routers, it is known as an ``active'' routed.
By default, the routed daemon on a host with a single network interface is ``passive'' or ``quiet''. It listens for broadcast routing table information from local routers so that it can update its own table, but it does not supply routing information.
Even if the local routers on a subnet use routed, you can choose not to run routed on the non-routing hosts if the routes to the usual destinations do not change.
If hosts are configured to run routed, you can configure either routed or gated to run on the routers.
To enable routed on a non-routing host:
sort-key:/usr/sbin/in.routed:/usr/sbin/in.gated:y:::
no_rip
See also:
To enable gated on a non-routing host:
# Turn off unwanted protocols
#
bgp off ;
egp off ;
ospf off ;
#
# Turn on RIPv2 in passive mode
#
rip on {
	nobroadcast ;
        interface all version 2 noripout ;
} ;
#
# Define a static route to this host via the loopback interface,
# and retain the route even if gated is shut down gracefully
#
static {
	host address gateway localhost retain ;
};
The value of address in the static
statement is the host's IP address. It is not
the loopback address, 127.0.0.1.
If you want the host to use router discovery to find a default route, and not to use a routing protocol such as RIP or OSPF, specify the following lines in its /etc/inet/gated.conf file:
#
# Configure this host to use router discovery only
#
bgp off ;
egp off ;
ospf off ;
rip off;
routerdiscovery client yes;
#
# Define a static route to this host via the loopback interface,
# and retain the route even if gated is shut down gracefully
#
static {
	host address gateway localhost retain ;
};
sort-key:/usr/sbin/in.gated::y:/etc/inet/gated.conf::
See also:
Router discovery (described in RFC 1256) is intended to provide a flexible alternative to configuring static default routes on hosts that are connected to networks with more than one router. The mechanism allows hosts to set up their routing tables by sending out solicitation messages on the local network. Routers on the local network respond with advertisement messages that contain the IPv4 addresses of the router together with ``preference level'' for each address. The preference level value is used to indicate which route a host should prefer over others when it configures the default route in its routing table. The address with the highest preference level is installed as the default route. Addresses with a preference level of 0 are never used.
Routers readvertise at configurable intervals (the default is 600 seconds) to allow hosts to update the default route. If a host does not receive a fresh advertisement within a given period (usually 3 times the readvertisement interval or 1800 seconds), it deletes the default route entry that it has learned via the router discovery protocol.
Both the routed and gated routing daemons support router discovery:
The routing daemon, routed(1Mtcp), in UnixWare® 7 implements router discovery as its default behavior. A UnixWare 7 non-routing host running routed will send out router discovery solicitation messages. A UnixWare 7 router (a system with more than one network interface configured, and with ipforwarding and ipsendredirects set to 1) running routed will advertise its routing tables and respond to router discovery solicitation messages.
Router discovery may be turned off on a host by specifying the no_rdisc keyword in the /etc/inet/gateways file.
To enable advertisements on point-to-point links, specify rdisc_adv in /etc/inet/gateways. To enable solicitations on point-to-point links, specify send_solicit in /etc/inet/gateways.
If you configure non-routing hosts to only use router discovery, you must also configure the routers on the local network to listen for router discovery solicitations and to send advertisements.
On non-routing hosts, routed keeps track of received router advertisements, adding a default route for the highest preference route. For this reason, multiple routers running router discovery on the same subnet should use different preference values with the most preferred route having the highest preference value. Do not configure a router to advertise a route on an interface if this might lead to inefficient routing of packets through the local subnets. You can either configure a preference value of 0 to prevent a route being added or turn off advertisements on an interface altogether.
The following example entries from a router's /etc/inet/gateways cause routed to advertise a route with a preference of 10 on the subnet connected to the en1 interface, but not to advertise on the subnet connected to the en0 interface:
   if=en0 no_rdisc_adv
   if=en1 rdisc_pref=10 rdisc_interval=45
In this example, the interval between sending router discovery advertisements is set to 45 seconds. This value is substantially lower than the default interval of 600 seconds (10 minutes) to allow non-routing hosts to update their default route more frequently.
If some routers on a subnet implement router discovery while others do not, or if identical or incorrect preference values are configured on the routers, this may cause non-routing hosts to install an incorrect default route.
To disable router discovery on routers and non-routing hosts running routed, add the following line to /etc/inet/gateways:
no_rdiscRestart routed by killing its process and rerunning in.routed. Alternatively, shut down and reboot the system.
See routed(1Mtcp) for more information about the configuration of router discovery in routed.
To configure a UnixWare® 7 router running gated(1Mtcp) to advertise its routing tables and respond to router discovery solicitation messages, you must specify it as a router discovery server in its /etc/inet/gated.conf file. Include a line such as the following in the protocol definition statements:
routerdiscovery server yes;As described in ``Configuring router discovery using routed'', it may be desirable for a router to specify difference preference values on different routes to avoid inefficient routing.
The following example entries from a router's /etc/inet/gated.conf cause gated to advertise a route with a preference of 10 on the subnet connected to the 172.16.2.1 interface, but not to advertise on the subnet connected to the 172.16.3.1 interface:
   routerdiscovery server yes {
   	address 172.16.2.1 preference 10;
   	address 172.16.3.1 ignore;
   };
To configure a UnixWare 7 non-routing host running
gated to send out router discovery solicitation messages,
include a line such as the following in the protocol definition
statements:
routerdiscovery client yes;After changing the gated.conf file, enter the command gdc reconfig to tell gated to re-read it.
See gated.conf(4tcp) for more information about the configuration of router discovery in gated.
An IPv6 router must run the ndpd-router(1Mtcp) daemon to send Neighbor Discovery Protocol (NDP; see RFC 1970) router advertisements to other routers and non-routing hosts. ndpd-router also allows the router to determine the link-local and site-local addresses of machines on the subnets (or ``link'') that are directly attached to its network interfaces.
The following routing protocols are available for exchanging IPv6 routing information:
If you configure gated to run on an IPv6 router, do not configure routed to run on the same system.
See ``Configuring gated on a router'' for a description of how to configure gated to handle IPv4-compatible routing protocols on a router.
To configure an IPv6 router:
If a site-local IPv6 address has not been configured
for an interface on which you want to use IPv6 routing,
enter the following command to configure a site-local address:
ifconfig interface inet6 fec0::subnet_ID:interface_ID/64 alias
interface is the name of the interface. subnet_ID is the 16-bit portion of the interface's IPv6 address that encodes the ID of a subnet at a site. interface_ID is the final 64-bit portion of the IPv6 address that encodes the hardware (or MAC) address of the network interface.
For example, if interface en0
has a link-local IPv6 address of
fe80::204:acff:fe86:298d, and the subnet ID is 11,
the corresponding command would be:
ifconfig en0 inet6 fec0::11:204:acff:fe86:298d/64 alias
The -g option makes ndpd-router broadcast a default route using RIPng.
If you want to use ndpd-router instead of
gated to exchange RIPng information
with other routers, enter the following command to start
ndpd-router:
ndpd-router -gs
See the ndpd-router(1Mtcp) manual page to determine additional option flags that may be applicable to your network configuration.
Edit the /etc/inet/gated.conf file to represent the desired configuration of the gated daemon for routing IPv6 packets. See ``Sample RIPng router configuration statements'' and ``Sample BGP4+ gateway router configuration statements'' for examples of suitable configuration statements.
The configuration statements can be interspersed with statements that configure IPv4 routing protocols provided that the order specified in the gated.conf(4tcp) manual page is followed.
Enable RIPng on all network interfaces:
   ripng yes {	/* turn on RIPng */
   	interface all ripin ripout; /* send and receive RIPng on all interfaces */
   };
The following variation turns off RIPng on one interface of
a router with three interfaces:
   ripng yes {	/* turn on RIPng */
   	interface en0 ripin ripout;      /* send and receive RIPng on en0 */
   	interface en1 ripin ripout;      /* and on en1                    */
   	interface en2 noripin noripout;  /* but not on en2                */
   };
Control which routes are advertised to other
local routers by RIPng:
   export inet6 proto ripng {
   	proto static {
   		all; /* advertise routes specified in static statements */
   	};
   	proto direct {
   		all;  /* advertise routes to directly attached subnets */
   	};
   };
Define the autonomous system number for a gateway router:
as 64000;If the system is already configured as a gateway router for IPv4, such a statement may already exist in the gated.conf file, possibly using the long form of the as keyword:
autonomoussystem 64000Define the autonomous system number of the BGP4+ neighbors that are in the same group as this autonomous system, and the global unicast IPv6 address of their gateway interfaces:
   bgp4+ on {
   	traceoptions packets;
   	group type external peeras 64001 {
   		peer 3ffe:1c00:0:10::150;
   	};
   };
IPv4 static route definitions may be extended to define
the IPv6 address of the route:
   static {
   	default gw 192.168.10.1 retain;
   	inet6 3ffe:1c00:: masklen 48 gw 3ffe:1c00:0:10::205;
   };
Here gw is a shortened form of the gateway keyword.
The following statements control which routes are accepted from and advertised to external autonomous systems by BGP4+:
   import inet6 proto bgp4+ as 64001 {
   	all; /* accept all routes received from autonomous system 64001 */
   };

   export inet6 proto bgp4+ as 64001 {
   	proto static {
   		:: masklen 96 restrict; /* do not export routes to
   					   IPv4-compatible IPv6 addresses */
   		all metric 1;
   	};
   	proto direct {
   		all restrict; /* do not export local routes */
   	};
   };
Each non-routing IPv6 host on an IPv6 network must run the NDP host daemon, ndpd-host(1Mtcp). This allows a host to receive router advertisements from the ndpd-router daemons running on local IPv6 routers, and to determine the link-local addresses of other machines on the same subnet (also known as a ``link'').
Optionally, you can next configure the gated(1Mtcp) daemon on an IPv6 non-routing host to use RIPng routing information received from IPv6 routers.
See ``Configuring gated on a non-routing host'' for a description of how to configure gated to handle IPv4-compatible routing protocols on a non-routing host.
To configure a non-routing IPv6 host:
If a site-local IPv6 address has not been configured
for an interface on which you want to use IPv6,
enter the following command to configure a site-local address:
ifconfig interface inet6 fec0::subnet_ID:interface_ID/64 alias
interface is the name of the interface. subnet_ID is the 16-bit portion of the interface's IPv6 address that encodes the ID of a subnet at a site. interface_ID is the final 64-bit portion of the IPv6 address that encodes the hardware (or MAC) address of the network interface.
For example, if interface en0
has a link-local IPv6 address of
fe80::204:acff:fe86:298d, and the subnet ID is 11,
the corresponding command would be:
ifconfig en0 inet6 fec0::11:204:acff:fe86:298d/64 alias
ripng yes { /* turn on RIPng */
	interface all ripin noripout; /* receive RIPng */
This configuration statement
can be interspersed with protocol statements that configure
IPv4 routing (such as rip and ospf)
provided that the order specified in the
gated.conf(4tcp)
manual page is followed.
Other sections of this topic discuss the routing of unicast packets which have a single destination address. Multicast datagrams, however, are intended to arrive at several addresses but not all addresses (unlike broadcasting). This feature is used by networking application programs that want to allow the participation of several (or many) interactive users on different systems. It avoids the difficulty and overheads of having to set up multiple unicast connections between each possible pair of machines that might wish to communicate. Broadcasting is also not a suitable solution as it will only work within subnets and not all machines may wish to participate.
Multicasting uses class D IPv4 addresses in the range 224.0.0.0 to 239.255.255.255 with the lowest 28 bits of the address forming the ID of the multicast group. If a machine wishes to join a multicast group on a particular Ethernet or FDDI interface, its network adapter must be programmed to receive frames destined for a special 48-bit MAC address. This MAC address is based on the IP address of the multicast group but it is not unique to it. If the interface is via a Token-Ring network adapter, a single MAC address is available for use. In all cases, the network adapter driver has to perform filtering so that only datagrams for the correct multicast group(s) are passed up the networking protocol stack toward the application.
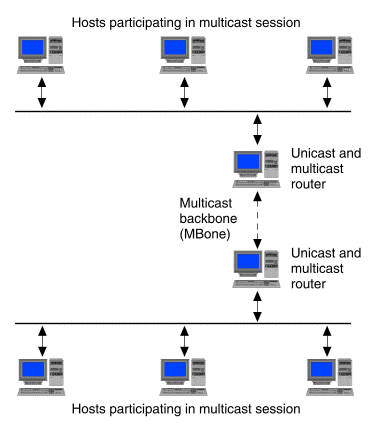
The Internet Multicast Backbone (MBone) is a network of routers on the Internet that can forward multicast datagrams. It allows the provision of group communication for applications such as audio and video conferencing where more than two hosts wish to participate at a time. It also allows broadcasting across the Internet to only those networks which wish to participate. Several network services (such as NTP and RIPv2) can also use multicasting but this is not discussed further here.
If you want to participate in a multicast session either within your intranet or on the Internet MBone, you will need to know its multicast address and which UDP ports it will use. Conferencing software and other application programs that use multicasting often have facilities for announcing forthcoming multicast sessions, and for receiving such advertisements.
The MBone relies on a network of routers that support the forwarding of IP multicast datagrams. It is possible to connect to the MBone if intermediate routers between your site and the MBone do not support multicasting using a technique known as ``tunneling''. Multicast routers at each end of the tunnel encapsulate multicast datagrams within unicast IP datagrams so that the information can pass unhindered to the other end of the tunnel. Once an encapsulated datagram arrives at the other end of a tunnel, it can be unwrapped and transmitted as a multicast datagram.
The need for tunneling is becoming rarer as the MBone grows and more hardware routers become capable of forwarding multicast datagrams. Contact your Internet service provider or the administrator of your local autonomous domain if you wish to use MBone facilities.
The mrouted(1Mtcp) daemon can implement multicast routing directly to other multicast routers such as those on an Intranet or the MBone as shown in ``Multicast routing directly on the MBone''.
Multicast routing directly on the MBone
If no external multicast routers are available, you can use mrouted to set up a tunnel to a multicast router on a distant subnet. The tunnel is defined using a tunnel statement in the file /etc/inet/mrouted.conf. This example entry defines a tunnel from the IP address of the local multicast router, 200.20.34.12, to the IP address of the remote multicast router, 190.146.25.24:
tunnel 200.20.34.12 190.146.25.24 metric 1 threshold 32The next example extends the previous example by defining a boundary so that mrouted will not forward multicast datagrams which originate from the local 200.20.35.0 network:
   name PRIVATE 200.20.35.0/24
   tunnel 200.20.34.12 190.146.25.24 metric 1 threshold 32 boundary PRIVATE
The remote machine at the other end of the tunnel must have a corresponding definition in its mrouted.conf file that defines a tunnel in the opposite direction:
tunnel 190.146.25.24 200.20.34.12 metric 1 threshold 32For more examples, see the mrouted(1Mtcp) manual page.
Once a tunnel is established, encapsulated multicast datagrams may travel via unicast routers that do not support multicast routing as shown in ``Multicast routing via a tunnel''.
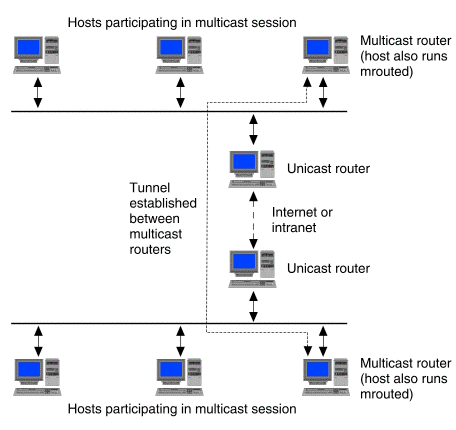
Multicast routing via a tunnel
Unicast routers with more than one interface are automatically
configured to start mrouted. If a tunnel is required,
create a suitable entry in the file /etc/inet/mrouted.conf
and then signal the change to mrouted using the command:
kill -HUP `cat /etc/inet/mrouted.pid`
To configure a multicast router on a host which is not a unicast router:
sort-key:/usr/sbin/in.mrouted::y:::
The following sections describe how you can use the netstat(1Mtcp) command to troubleshoot routing on a system:
If you suspect problems with the routing daemon, routed(1Mtcp), you can log its actions and packet transfers.
To create a trace file for routed:
sort-key:/usr/sbin/in.routed:/usr/sbin/in.gated:y::options -T tracefileNote that you should preserve the existing routed options.
To trace more information, specify one or more -t options in addition to the -T option:
As before, pid is the process ID of routed found using ps.
To decrease the trace logging level, send
the SIGUSR2 signal to routed:
kill -USR2 pid
You can also use the rtquery command to change the trace logging level of routed and obtain a dump of the daemon's routing table. See the rtquery(1Mtcp) manual page for more information.
The netstat -r command provides information about the usage of each route configured on your system. A route consists of a destination host or network and a network interface used to exchange packets. Direct routes are created for each interface attached to the local host.
This avoids the considerable overhead of resolving IP addresses to host names. This form of the command is useful when debugging routes as it rules out possible additional, unrelated problems with name resolution.
At a minimum, your routing table should display entries for the loopback
mechanism (localhost), the local network, the local hostname,
and the IP Multicasting route, 224. The following is a
typical display:
   Routing tables
   Destination     Gateway         Flags     Refs     Use   Interface
   localhost       localhost       UH        24       66    lo0
   172.16.118      nile            UC        1        0     en0
   nile            localhost       UGHS      3        36    lo0
   224             nile            UCS       0        0     en0
   ...
The columns display:
DestinationGatewayFlagsCGHNSURefsUseInterfaceUse the netstat -rs command to display routing statistics. You can use the resulting display to determine if your network is having routing problems. This is sample output:
   routing:
           0 bad routing redirects
           0 dynamically created routes
           0 new gateways due to redirects
           489 destinations found unreachable
           0 uses of a wildcard route
           226 routes created by PMTU discovery
           51 routes modified by PMTU discovery
           226 routes discarded by PMTU discovery
If the output indicates
that bad routing redirects occurred
or that a number of destinations were found unreachable,
there are problems on your network.
If you are unable to communicate with networks that your gateways can reach, you may need to adjust your netmask. This may be the case if netstat -r on a host displays your local network address incorrectly. For example, it displays a class B two-octet network address, such as 135.7, when you know that class C subnetting should be in operation and its network address should be displayed as 135.7.4. An incorrect netmask will result in a host having incorrect entries in its routing table, and will prevent it from receiving routing updates broadcast from local routers.
To adjust the netmask on a host:
For example, a network adapter configured with IP address ``172.16.4.25'' might be shown as using the class B netmask ``255.255.0.0'' and broadcast address ``172.16.255.255''. However, the local network is actually a class C subnet of a class B network, and so it should be configured with the class C netmask ``255.255.255.0'' and broadcast address ``172.16.4.255''.